by Felicien | Dec 26, 2017 | Education
If you run a business, chances are that you’ve thought about moving to an online productivity suite. The two most popular in recent years is Google’s G Suite and Microsoft’s Office 365. Touted as “innovative” and “the next big thing,” Microsoft’s productivity suite is a revolutionary concept when it comes to operating systems and computing. But why should you choose Microsoft over the other guys?
Because:
It’s cloud-based. Doing all your computing in the cloud means that you always have access to your files as long as you’re connected to the Internet. All of Office 365’s tools will work on any PC/Mac, tablet, or smartphone. With O365, you can use the online versions of the productivity suite, or install them to your device.
It’s secure. Whether you’re using the version of O365 installed on your machine, or the cloud version, you’ll get the best level of security and encryption. The same set of Rights Management Services applies to both. None of your files can be accessed without the proper user credentials that are set up and monitored by Microsoft Azure. This provides the best security and control over your Office 365 data.
Data is backed up. Microsoft’s Office 365 offers its own form of checks and balances, 24/7 support that’s always on-call, and OneDrive to store all your files. But it’s always a good idea to have an extra layer of protection by using a Managed Services Provider (MSP) who can monitor your backups and add an extra layer of security if your data is compromised or lost.
Office 365 offers major advantages over others. As with anything worth doing, there are pros and cons when moving your operations to the cloud. However, there are some major advantages when using the Microsoft Cloud:
You can work anywhere. If you have an internet connection, you can use your data from anywhere and on any device. You can check emails, access files, and work on a project all from the same place – even if that place happens to be the other side of the world.
Easy collaboration between coworkers. How many times have you had multiple people working together on the same project only to have one version go missing. With Office 365 you can avoid this. Collaborators can work on the same file and get changes in real time. You can also share files as links right from OneDrive, rather than as attachments.
Access to the latest versions of programs. Imagine having access to the most current versions of Word, Excel, and Outlook without having to pay extra or reinstall programs. All the most recent versions of everything in the Microsoft Office Suite are available with an Office 365 subscription.
Great security features. How secure the Cloud is for you depends on what security measures you have in place. With Office 365, there are quite a few built-in security features to keep your data safe. These include:
Encrypted email. Only the intended recipient can read an email.
Data loss prevention. O365 checks and ensures that sensitive data (like your social security number) doesn’t get sent out via email.
Mobile device management. You can control Office 365 on your employees’ phones, and protect company information.
Advanced threat analytics. O365 learns and protects company data, and alerts you of suspicious activity on the network.
Alongside all the advantages of using Office 365, there are also a few cons:
Subscription-based model. You must pay a monthly or annual subscription for your Office 365.
If the Internet is down, your data is down. Because Office 365 is cloud-based, if the Internet goes out, you could be without access to your data. Plus, if you have a slow connection, working with a cloud-based system isn’t ideal.
Most people don’t use all of its features. Most users don’t use everything that Office 365 has to offer. They only use email, file storage, and access to Office programs. This isn’t a terrible thing, but it means you’re paying for features that you aren’t using.
Microsoft throws in some great extras. Office 365 comes with 1TB of storage space in Microsoft’s OneDrive cloud storage service, free web hosting and the tools to use it, and a full 60 minutes of Skype each month for making landline calls.
Microsoft Office 365 is a very good example of not only what a cloud service can be, but what more businesses are turning to for their cloud needs. Cloud computing is becoming a big part of more companies’ tech strategy, and Office 365 is an excellent way to jump into the cloud.
Our IT experts can walk you through your Office 365 set up. Give CompNetSys a call at 1.866.205.8123 or email us at support.staff@compnetsys.com, and we’ll make sure you get the full benefit of this great service.

by Felicien | Dec 26, 2017 | Education
Microsoft continues to add exciting features to Word with each new version that’s released. The “Track Changes” feature has been around since Word 2003, and it still works the same today as it did back then.
When creating a Word document there’s nothing extra you need to do. The Track Changes feature only comes into play when an editor, or customer, gets the first draft of a newly created document.
Here’s how to use Track Changes:
Begin by opening the document in Word.
Next, click on the “Review” Tab.
The Review Tab
There are many helpful features under the Review Tab. The first section is called “Proofing.” This is where you can find the tools you need to write an article or essay. The Proofing section lets you check spelling and grammar, do research, or check the Thesaurus, and get the actual Word Count in a document. In many instances, it’s important to know the word or character count, especially for SEO (Search Engine Optimization) when writing content for information on the Internet.
The next section under the Review Tab is called “Language.” Here you can translate a document or choose a different language to write with. You might be more comfortable writing in Spanish or German. Or you may have been hired to write blogs for a French company. In any case, this is a handy tool to use when you write or edit in a different language.
The next section under the Review Tab is titled “Comments.” This is easy to use. However, there are a few things to be aware of. Be sure to place your cursor in the sentence at the exact place where you’d like to make your comment. Then click on “New Comment” and start typing. To delete a comment, simply right-click on the comment and choose “Delete” from the drop-down list.
Now “Tracking.” Under this section, you’ll find “Track Changes,” “Balloons,” “Final Showing Markup,” “Show Markup,” and the “Reviewing Pane.” By hovering over any of these, you can get more information about what they do.
Let’s take these, one at a time, and go over how to use them correctly:
Track Changes
Once you click on Track Changes, any typing you do in the document will be red and underlined. To stop Track Changes, simply click on it and your typing will return to normal. In most situations, you would not want to turn on the Track Changes feature while writing or creating your initial document. It should only come into play after you’ve completed the article and sent it to an editor or client for their review.
Once the editor gets the article for review, they will turn on “Track Changes.” This will allow them to go into the document and make changes that are readily visible to everyone.
Article Naming Tips
Rename and resave the original article under a different name. The most commonly understood name would be something like: Revised1 or Revised plus the date. This makes it clear what version of the article you’re working on. It also makes finding different versions of a document much easier.
If several people are going to make edits to a document, then you should use the original name of the document plus the editor’s initials and the date. An article on Monarch Butterflies might look something like this:
First draft: Monarch Butterflies
First draft edited by Jane Smith: MonarchButterflies.JS.122117
Same doc edited by Gary Jones: MonarchButterflies.GJ.122317
Second draft: MonarchButterflies2
When a document is edited several times by various people, it’s important to keep track of who did what, and on what date. This can eliminate sending the wrong version out to a client or editor.
Change Tracking Options
An editor can choose from several options under Track Changes>Change Tracking Options. You can change the colors of insertions, deletions, and strikethroughs. There are also options for table-cell highlighting, formatting and balloons.
The third option available under Track Changes is “Change User Name.” This can be used to let everyone know who was responsible for a specific revision of a document.
The next feature in the “Tracking” group of commands is “Balloons.” There are three drop-downs available:
“Show revisions in Balloons”
“Show all revisions in line”
“Show only comments and formatting in Balloons.” This last option is the default and is what most people use.
To the right of Balloons, there are three options available in the “Tracking” section. You can hover over each one to learn more about what it does. Below are the basic descriptions of each one:
“Final Showing Markup. Display for Review.” Choose how to review the proposed changes to the document.
“Show Markup.” Choose what kind of markup to show in the document.
Reviewing Pane: Show revisions in a separate window.
Accepting and Rejecting Changes
To the right of Tracking is “Changes.” This is where you can accept or reject changes made to a document. If you trust the person who edited the document, you can save a lot of time by clicking on “Accept,” then going down to “Accept All Changes in Document.”
In just a moment’s time, you can accept every change that’s been suggested by all editors.
Please note that it’s important to proofread the document to make sure there are no wandering spaces or periods. It can be very difficult to get periods and spaces exactly right after a document has been edited several times.
If you don’t want to “Accept All Changes” at once, then you must go through the document one change at a time and decide whether to “accept” or “reject” the change. This can be painstakingly slow. However, some people want a better level of control over the final document. Therefore, they should take the time to do this. The “Previous” and “Next” commands let you move forward or backward when checking the corrections made.
Compare and Protect
To the right of “Changes” you’ll find “Compare.” This section lets you compare or combine two different versions of the document. Unless you’re absolutely sure of what you are doing, this tool can make a mess out of your document—So, use it with caution!
For more information about “Track Changes” in Word, or questions about other Microsoft tools, contact {company} at {phone} or {email}. Leave the details to us, so you can concentrate on your business.
The next-to-last section in the Review tab is called “Protect.” If you’ve used Google Docs before, then you’ll easily understand how this feature works. In Google Docs, you can give another person access to a document. However, there are different levels of access, such as view, edit, etc.
You might want to prevent certain people from making changes to a document. To accomplish this in Word, click on “Protect Document>Restrict Formatting and Editing.” There are three options available to you:
Formatting restrictions-Restrict the formatting styles that can be used.
Editing restrictions-Allow only specific edits to document.
Start enforcement-When do you want to apply these settings?
The default for most documents is “unrestricted Access.” This allows anyone to make any type of change they deem necessary. If you click on “Restricted Access,” then a dialog box will open asking you to sign up for Microsoft’s “Information Rights Management Service.” Many companies have their own version of this. However, you can sign up and pay a monthly fee for this Microsoft service.
In a wide range of businesses, certain documents contain things that the company doesn’t want made public. This type of information can range from the recipe for Mrs. Smith’s Cookies, to an intelligence report generated by the FBI. Most companies won’t need to use this service, but it’s important to know what it is, and that it’s available through Microsoft.
Linked Notes
The very last section of the Review tab is called “Linked Notes.” It contains only one option, “OneNote.”.Linked Notes allows you to dock OneNote to either side of the computer screen. This is handy if you need to reference information found on various websites. It prevents you from having to look back and forth to take notes on a topic. In addition, your notes are automatically linked to whatever you are researching. This feature is available in Word 2010 and up, but not in Word 2007 and backwards. It works with PowerPoint, Word, Internet Explorer and other OneNote pages.

by Felicien | Dec 22, 2017 | Education
Regularly backup the data on all computers. Critical data includes word processing documents, electronic spreadsheets, databases, financial files, human resources files, and accounts receivable/payable files. Backup data automatically if possible, or at least weekly, and store the copies either offsite or on the cloud.

by Felicien | Dec 22, 2017 | Education
Best Practices for Testing Data and Application Backups.
Data protection is essential for all businesses today. The most important reason is to prevent monetary loss. If you lose your information it can lead to reduced productivity, lost sales, a harmed reputation, fines, or even financial judgments.
Another reason is the increase in regulations. Governments throughout the world are imposing new regulations on electronic communications and stored data. You can face dire consequences for noncompliance. Loss of critical data can be construed as a violation of these regulations and may result in fines and legal action.
Data Protection Requires Business Continuity and Reliable Backups.
A proactive and well-thought-out business continuity plan is something that all system and data administrators must embrace. A layered and proactive data protection strategy can mean the difference between disaster and recovery.
When it comes to creating a strategic business continuity plan, data and application backups are one of the most important elements. The reasons for implementing reliable backup solutions are endless – software bugs, failed hardware and user error are just some of the ways your data can be unintentionally altered or deleted.
There’s also the persistent risk of malicious activity and attempts to destroy, steal or encrypt business data by cybercriminals or disgruntled former employees.
Data Protection Insurance: Don’t Just Backup, Test!
If you don’t test your backups regularly to ensure their working, you’re only doing half the job. Don’t wait until there’s an actual disaster. If you do, you may find that your backups weren’t reliable and your essential data is lost. That’s why regular testing of backups for your software, hardware and everything in between is absolutely critical.
When a data disaster hits, it can be overwhelming and stressful. Worrying about whether or not backups are going to work should be the last thing to worry about in a crisis situation. Backups are designed to offer peace of mind, and – if implemented correctly and tested regularly – they can make all the difference in a data crisis.
Server vs. Virtualization: The Evolution of Backup Testing
The key to testing backups is to run drills to determine if your data was successfully restored. For a long time, this process was limited, tedious and time-consuming. When using physical servers for different applications, data restoration had to include a lot of additional hardware. Plus, the environment could only be restored in a very limited way, meaning a full restore of an entire business network rarely occurred.
However, with today’s virtualization, the testing and restore process is now much easier to deploy. Virtualization allows for company data and applications to be organized in a more streamlined way. When using a centralized, virtual machine (VM), recovery from a backup is easier and more reliable.
Why Test Your Backups?
To validate that the restore processes you put in place actually work – Peace of mind is priceless.
To create a benchmark to ensure the recovery process can be completed as intended – This also allows you to develop recovery time objectives (RTO) for future reference.
Regular testing processes and results can be shared with business teams to confirm application recovery targets can be met, or resolved if there are imperfections.
Testing Backups: What Programs and Hardware Should You Test?
Now that you understand the importance of testing business backups, let’s dive into the specifics. When it comes to testing backups, there are a variety of different levels of recovery to consider. Let’s explore the key areas where your business should be testing backup and recovery processes:
File Recovery
This is likely the most common concern for business owners – “Will I be able to recover individual files from my backup?” The reality is, file backup processes are easy to deploy on both physical and virtual servers in addition to backups of file servers. It really just comes down to recovering data by file type. There are plenty of tools to automate this process, which we’ll explore in more detail later on.
VM Recovery
For businesses that rely on virtual machines (VM), implementing and testing backups is critical. This is obviously specific to virtual environments as opposed to physical ones. Recovering a virtual machine is relatively easy because everything is centralized. However, you must consider where the VM will be used for recovery.
Attempting to recover the VM in the same production environment creates technical issues like network IP and SID conflicts in Windows systems. The best strategy is to restart the VM in an isolated environment using the subnet on the hypervisor. It’s also important to keep in mind that recovering VMs with new IDs can impact applications and licensing – It’s always best to be proactive and consult with your software providers for terms and conditions.
Physical Recovery
As noted, physical server recovery is more complex, and testing will vary based on the how different platforms are configured. In addition, recovering applications to the running hardware requires an outage – Because of this, businesses carry out these tests less frequently. If you’re on a physical setup, it’s critical to schedule the time for testing to ensure hardware can be recovered effectively in the case of a disaster.
Data Recovery
Depending on the backup tools you deploy, specific data recovery should be tested for efficiency as well. For example, if you have data backed up at the application level (rather than the entire VM), that data should be restored and accessed in an isolated environment.
Application Recovery
Software applications are the core of a company’s digital operations. However, testing application backups can be challenging – especially for larger businesses. Application backup testing requires an understanding of the relationships between individual VMs and physical servers. However, it can be done, and as with some of the previous recovery types we’ve mentioned, it’s best conducted in an isolated environment and on a separate network.
It’s no secret that the more extensive the testing, the higher level of risk – However, backup testing can be an amazing tool for providing reassuring, measurable results. Determining the right test scenario depends on the backup and restore tools you’ve put in place. Having a strong understanding of what you want your backups to if an emergency occurs will make the testing process more efficient.
Setting a Schedule: How Often Should You Test Your Business Backups?
We get this question from our clients all the time – “Now that we have backup solutions in place, how often should we test them?” In an ideal situation, testing should occur after every backup to ensure the latest data is successfully secured.
However, we know for busy professionals like our clients, this isn’t the most effective or reasonable option. So, business owners must strike a balance between the potential impacts of losing data and the effort required to be confident in their backups.
Here are some important times to test backups:
As part of a regular routine – monthly or bimonthly. Choose a frequency, set a schedule and deploy backup tests for all hardware and applications at regular intervals.
Whenever there are major application or hardware changes. This includes any kind of software update or patch, and also when using new or different devices. These tests should be more complex to account for a major application or device changes. Use updates and patches as reminders for strategic backup testing.
Whenever there’s a significant change to application data. If a business application has a regularly scheduled import of data from an external source, always schedule a test restore after the data has been transmitted.
Whenever you’ve restored data. It may seem excessive or redundant to run a backup test on a VM, device or application that you’ve just recovered, but it will ensure the newly restored program is properly backed up moving forward.
How to Test: Using Automation to Improve Backup Testing
Restore testing is much easier when using automation tools. At a base level, this can include scripting the restore for individual files. However, there are software tools that aid in more complex and comprehensive testing procedures. Many of these are built directly into backup and disaster recovery software.
These tools completely automate the testing process and allow restores to occur without affecting production or productivity. There are countless ways for you to take advantage of backup and data recovery tools – The key is researching the best tools to suit your unique backup needs. Take the time to understand your backup needs. Then you can invest in applications or support to optimize backup testing procedures.
The Ongoing Evolution of Data Backup and Recovery Testing
In an increasingly cloud-based business environment, with more companies making use of containers, backup testing will continue to evolve. Using the public cloud to backup, test and recover applications is a huge plus when it comes to cutting on-premise costs. This represents an entirely new domain for backup testing that will no doubt reveal new challenges and opportunities.
However, no matter what the future brings, the premise remains the same. Setting up backups and testing them regularly should be understood as a responsibility, not an option. Ensuring that recovery processes are implemented correctly and run according to a schedule will always be your secret weapon against unexpected data disasters.
by Felicien | Dec 21, 2017 | Education
The AutoText feature in Word 2016 (and older versions) can make typing long or complex words much simpler. For instance, let’s say you are writing a paper on the psychological effects of war on soldiers. Imagine having the type the word “psychological” over and over again. It’s one of those words that you have to think about to spell correctly.
Instead, let’s go over to the AutoText feature in Word and create a shortcut for the word “psychological”.
Below are the step-by-step instructions. It’s important to understand how to use this first before learning how to transfer those AutoText entries to Microsoft Outlook 2016.
Highlight the word “psychological” in your document.
Click the Insert button located on the ribbon.
Go over to “Quick Parts” located toward the far right and click on that.
A drop-down list opens. AutoText is the first option. Hover over AutoText and three new options will open.
Click on the first option, “Save selection to AutoText Gallery”.
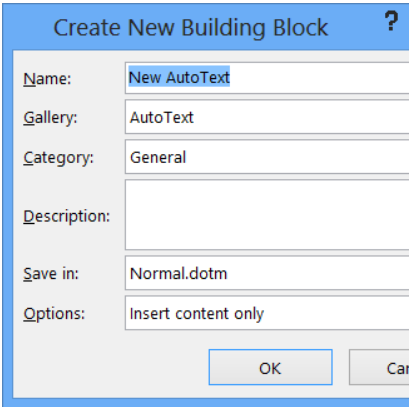
A new box called “Create New Building Block” opens. In this box, you are giving this particular entry a name you can remember.
The 2nd line in this box asks what gallery you want to save to. “AutoText” is the default, so leave that.
The next line asks about the category. Use the “General” category.
Adding a description is optional. You can leave this blank.
The next line says “Save in” and this question relates to where you want to save the abbreviation. There are two choices: Normal.dotm and Building Blocks.docx. In older versions of Word, these AutoText abbreviations were saved in Normal.dotm, so click on that.
The last line is called “Options”. This one gives you the option of inserting the content in different locations. “Insert Content Only” will simply insert the entry wherever you are typing in the document. The second option inserts the word in a new paragraph and the third one inserts the word on a new page. In most cases, you will want to select the first option.
Now, each time you want to type the word “psychological”, all you do is start typing the word and AutoText will fill the rest of the word in for you. The word automatically appears in the document. You can add an unlimited number of AutoText entries. You could create one for words or even phrases that you commonly use, such as “Thank You”.
How is AutoText Different from AutoCorrect?
Even older versions of Microsoft Word have a handy feature called “AutoCorrect”. There are already many words in this list. All the commonly misspelled words such as “received” are in there by default. If you type the word “received” and misspell it, AutoCorrect will automatically fix it for you. You can test this out by misspelling words like:
Misspelling
Automatically
Receive
Tennessee
Occasionally, you may run into a word that is not on the list. Or you may type a word like “occasionally” wrong most of the time. Many users do that. The word has two “c’s” and one “s”. AutoCorrect can fix it for you, but the default list only contains the word “occasion”. So let’s add “occasionally” to the list so that it is always corrected as well.
In Word 2010 and above, “Word Options” is found by going to File>Options>. Now click on “Proofing” found on the left side of the screen. If using Word 2007 and below, click on the Word Icon in the upper left-hand corner, then scroll down to “Word Options”, which is located next to “Exit Word”.
Once you get to the Proofing screen, click on “AutoCorrect Options”. Now you’ll see a list of commonly misspelled words on the left and their correct spelling on the right. Many different words and symbols are added to Word by default but it’s easy to add your own words to the list.
In the line named “Replace”, type in the misspelled version of the word. For this exercise, we are adding an autocorrect entry for the word, “occasionally”. The “Replace” line is where you want to type the incorrect version of the word: “occassionally”. Now type the correct spelling of the word in the “With” box: “occasionally”. Now each time you type the word wrong, it will automatically correct itself. This is a real time saver for those who type a lot and sometimes misspell the same words over and over.
The AutoText feature works very similar to AutoCorrect. One of the best features of AutoCorrect is that it works across all Microsoft Office programs. This means that if you add or delete a word in Word, the word is added or deleted in other office programs like Excel or PowerPoint.
How to Use AutoText in Microsoft Outlook 2016
Microsoft Outlook 2016 allows you to create pre-defined content that you can add to emails that you often send out. This is a great time-saver and it prevents errors. So let’s create an AutoText entry for the words, “Greetings to all my faithful fans.”
The simplest method (and there are several) is to open a new email in Outlook and type the words at the top of the page. Then highlight them and press Alt + F3. This opens a window called “Create New Building Block”. The default entries in this box are usually okay to use. The only thing to fill out is the first line, which is the name of the new entry. You could use the name “Greetings” or anything that tells you what the text is all about.
So enter the name “Greetings” in the first line, then choose “OK” to close the window. Now, when you go back to the email, start typing the word “Greetings” and the AutoText content will show up. Press “Enter” to insert the text (after making sure this is the correct AutoText you want to use.) This line of text is automatically filled in for you. You can press enter to get to the body of your email and continue creating your email.
Tip: If you’ve been using an older version of Word and would like to update your Normal.dotm files, simply open the newest version of Word. Next, open the Normal.dotm files and then “Save As”, using the newer Word format.
How to Find Your Normal.dotm Templates
The most common pathway to these files is:
C:UsersYour User NameAppDataRoamingMicrosoftTemplates
You can also type this into your Start menu: %appdata%MicrosoftTemplates
This opens the Templates folder in Windows Explorer. If you were to delete the Normal.dotm file altogether, then the original version of the file would be automatically recreated the next time you open Word. This would be the default version that does not contain all your additions and changes. You can also rename a customized version as Normal.dotm and Word will use that version as your default template the next time you open Word.
If you cannot locate the files, then follow these instructions:
Open Word, then go to File>Options>Advanced>File Locations>User Templates. You should be able to see the Normal.dotm files located there. Click on one to highlight the path to it in the browser bar and make a note of the pathway. Now close Word and restart it. Click on “Open” as you would to open a document. Follow the pathway to the Normal.dotm templates.
Working with Normal.dotm Files
Most Word users have AutoText entries in older versions of Word that they would like to move to their current version of Word 2016. Older versions of Word used the Normal.dotm format, so this makes it easier to move them to the new version of Word. Please note that Normal.dotm files cannot be updated or modified while Word is running.
First, find the template files as described above. Word usually keeps copies of older Normal files. For Word, these files are named NormalPre. For Microsoft Outlook, these files are named NormalEmailPre.
Next, make a backup copy of your Word Normal.dotm templates file. Now open Microsoft Outlook. Navigate to the templates directory. Paste the Normal.dotm file into that directory. Close Outlook and then when you reopen it, the Normal.dotm templates file should appear in the files.
Your AutoText entries created in Word 2016 should now be available in Microsoft Outlook 2016.

by Felicien | Dec 21, 2017 | Education
The new year is right around the corner. Thinning your inbox before next year may seem like a daunting task. It doesn’t have to be when you use our 8 easy steps and the tools we recommend. You will have that streamlined inbox of your dreams and a happy mail administrator going into 2018.
If you don’t mind me asking, “Which email user have you become?” The studious empty inbox practitioner or the depressed email junkie with 35,000 email squatters taking up residence in your inbox, dormant and unread?
If you are the junkie and collecting countless unread emails doesn’t alarm you, what about having to wait for a 12-hour download of your entire inbox? Because a restore was required for your off-site backup, and you won’t have access to those important client emails, that require immediate attention.
Would that get your attention? Then let me ask you, “How full is your inbox with dead or unread emails, that are sitting there, collecting dust?” Don’t know? That’s okay. Here are your 8 Easy Steps To Thin Your Bloated Inbox For The New Year.
Step 1: Empty These 3 Folders and Rid Yourself of Email Squatters.
This is the easiest step, to begin with. Start with your Spam, Junk and Trash folders. Nothing important will sit in these folders. Everything in these folders must be removed daily. If your email server has an option to, “delete it forever” then use it. A word of caution: Some whitelisted emails will find their way into these folders, due to email filters continually updating. So, check before deleting.
Step 2: Delete Html Newsletters You Never Read.
If you have unread HTML newsletters, older than a week, read them or delete them.
Html newsletters:
Are larger files
Take longer to load due to images downloading
Are Time sensitive and update weekly
They become outdated when the next issue arrives
If a particular issue has content worth keeping, print it out or save it to your computer. Then delete it from your inbox to free up needed space.
Step 3: Unsubscribe From Newsletters You Stopped Reading.
When unsubscribing from a text or Html newsletter, you have 2 options. Typically, at the bottom of an email newsletter, you should see an “Unsubscribe me” link. You click it. Next, you are instantly unsubscribed or taken to an unsubscribe page to finish the process.
If you subscribe to multiple newsletters, there is a faster way to unsubscribe and get off their lists. It’s called Unroll.me. It is a free tool that lets you unsubscribe from multiple newsletters all at once. You can also pick only certain newsletters to unsubscribe. As a bonus, Unroll.me will also catch any newsletters coming into your inbox and ask you if you want to unsubscribe.
Step 4: Make Folders For The Newsletters You Do Want to Keep
If you have newsletters you read on a regular basis and don’t want to delete them, make a folder and label it, “Subscriptions” or “Newsletters”. This keeps your newsletters separate from your higher priority emails.
Then inside the subscription folder create subfolders. These folders will be individually labeled by the newsletter title. For example – Huffington Post, Forbes, National Geographic and so on.
Step 5: Delete All Emails That Are Outdated and Irrelevant.
If you have emails, with outdated information no longer useful, then delete them. The only exception is a series of conversation emails. These serve as your paper trail dialogue you had with an individual about a project. Should a problem or questions arise, just refer back to the thread.
With these email threads, create a folder and label it “Past Projects”. In that folder create subfolders and label them per project name i.e. “Conversation – Smith Satellite Upgrade” or “Conversation – Rivera Panel Install”.
Step 6: Create Separate Email Accounts For Work and Personal.
Having work and personal emails on one account is distracting. You become unproductive and slows your momentum down. In some instances, you will be violating your company’s email policies having work and personal emails on your company’s computer. To avoid this, set up a separate account and forward all personal emails to your new account.
Applying, “Work emails at work and personal emails at home” principle, your inbox will see a significant reduction in email traffic and unread messages.
Step 7: Make Folders and Utilize Them.
This step is to create a folder system that seamlessly sorts your emails for you. How you sort your emails into folders depends on several factors or your preferences.
Such as:
Types of emails
How quickly you must respond
Subject
Sender
Or a mixture from the list above
Example: Me and a client are always emailing back and forth. I don’t always have time to read their response. So, I set up their folder and create a filter that sends their emails automatically into their folder. Now when I get a chance I can click on their folder and review their email.
With your folder system in place, it cuts down the time you spend sorting emails and keeps your inbox bloat free.
Step 8: Clear Out Your Deleted Folder.
Now, you have gone through and deleted everything you can possibly delete, it’s time for our final step. This step will be done once a month. Open your email’s “Deleted” folder and clear it out. This will serve 2 purposes.
Should your email system crash and a recovery are needed, an empty “Deleted” folder cuts down on restore time.
It speeds up your email’s load time.
In addition to these 8 steps, there are tools and plugins to curb your inbox’s appetite for unwanted emails.
Tools for the Job
Boomerang– if you are using Gmail Inbox, use this app for an email, when you don’t have time to respond. That email will come back up in your inbox later when time to respond is convenient.
MailDrop– this is a helpful tool when you need an email address for an online form, but are concerned of the spam email you may receive later. This website gives you a temporary email. You can use it for giving out information, without having to worry about receiving any junk mail later.
AwayFind– This app allows you to receive a text message of any, “Emergency emails” from your work email. And you don’t have to integrate it fully, onto your mobile device. This solves the problem of keeping your work email separate from your personal life. You will no longer miss anything important or that needs immediate attention.
IFTTT– “If This Than That”, is a great tool for setting certain tasks to automate themselves.
For example:
You can have a text sent to you when certain people email you
You can have attachments in all emails automatically uploaded to Dropbox
Schedule reminders for starred emails, and much more.
Sortd– this tool will automatically sort your incoming emails into separate categories depending on the requirements you set. It is one of the most highly used and in demand tool available currently.
All these tools are free or low-cost, making incoming emails a breeze to handle, once these tools are set in place. When your inbox is thinned, your productivity and focus will increase. You can prioritize, and email manage, easier than before.
Finally, you will feel much better after thinning your bloated email. Hopefully, our 8 easy steps and tools help you accomplish all your new year’s resolutions in 2018 and make your mail administrator happy!